
If you use Audacity to record and edit your podcasts, you know just how powerful the program is. One of its most beloved features, however, is noise reduction.
Audacity noise reduction goes a long way in making your podcasts sound clean and professional. Luckily, the effect isn’t hard to use.
Check out this guide to learn the best tips for using the Audacity noise reduction feature. We’ll go over why you should use it, what it can and can’t fix, and more.
Most importantly, we’ll give you step-by-step instructions for using this effect to remove the background noise in your episodes.
What Is Audacity Noise Reduction?
Noise reduction is one of Audacity’s many audio editing features. The software analyzes your audio file and reduces background noises from air conditioner humming, fan noise, electrical equipment, etc.

Why Bother With Noise Reduction?
Your Audacity workflow involves several steps. So, why should you use the noise reduction feature in addition to everything else you already do?
- 🛠️ It’s easy to use. As you’ll see later, only a few basic steps are involved, so you don’t have to climb a huge learning curve.
- ✨ It improves quality. Most notably, noise reduction is a simple way to improve your audio quality drastically. Your audience will appreciate how clean and professional your episodes sound.
- 💸It’s free. All users can download the open-source software from Audacity’s open-source website. So, using it will cost you nothing but your time.
What Can Noise Reduction Fix?
Natural noise reduction is your best bet. When you go to record, strive to create clean audio from the get-go.
While it’s ideal for recording under ideal conditions, we understand that life isn’t always so simple. You might be unable to turn off the AC or access high-quality recording gear.
So, you turn to Audacity noise reduction. This tool is most effective when the background noise is simple and consistent.
Some sounds it can remove include:
- Fan noise
- Humming from an air conditioner
- Buzzing refrigerator
- The whirring sound of a computer
To further ensure the effect’s success, the volume of your voice and other sounds needs to be considerably louder than the background humming or buzzing.
This way, when you go to edit, the tool won’t remove your voice or music, sound effects, etc.
What Can’t Noise Reduction Fix?
Audacity’s noise reduction effect is powerful but not a miracle worker.
Let’s say you decide to record a podcast while your roommates are home. For privacy, you set up your equipment in the basement. You decide to record in the room even though the dryer was on, reasoning that you can clean up the audio later.
The tool also isn’t good at removing inconsistent sounds. So, if your town is hosting a local air show, you should wait to record until after it’s over (unless you want roaring engines to pop up in your audio every time a plane flies over).
In short, the effect’s frequency smoothing only goes so far. Record under ideal conditions from the beginning to set yourself up for success.

How Do I Reduce Noise in Audacity?
Now that you understand the power of this tool, let’s go over how to use it. Open up the software and follow along with these easy step-by-step instructions:

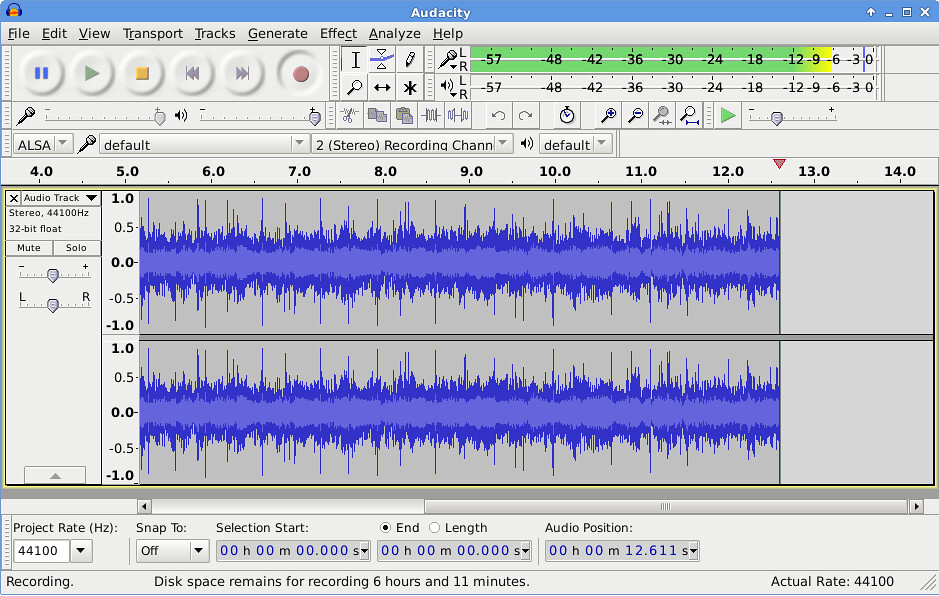
1. Record or Import Your File
Of course, you’ll need a file to work with. You can either record your audio through Audacity or import a file.
Remember—you’ll want to start with a track of the best quality possible. Do your best to eliminate instances of background noise before you get to the editing stage. Being proactive will put a lot less pressure on the effect to work miracles.
2. Select a Sample
Once your track is in the program, you will need to select a sample representative of the background noise you want to remove. To select a sample, you just have to left-click your mouse and drag the cursor over the desired portion.
The sample you select should be only a couple of seconds long and consist of the room’s white noise. When you play back your selection, you should not hear anyone talking or even other sounds such as clacking keys.
You’ll thank yourself when you edit, as the perfect sample will be right at the beginning of the recording.
If you fail to do this simple step, it might make the editing process more difficult. You’ll have to search your recording for a sample that perfectly captures the buzzing or humming you’re trying to eliminate.
3. Use the “Get Noise Profile” Button
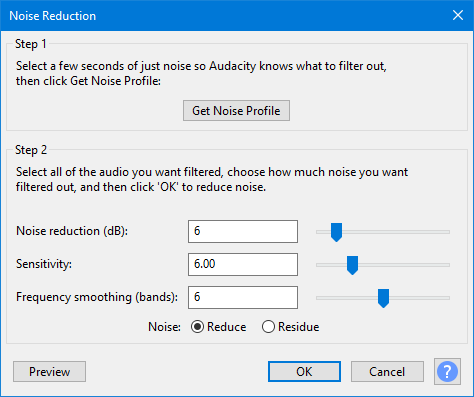
With your sample selected, navigate to Effect > Noise Reduction in the drop-down menu. Then, click the “Get Noise Profile” button.
This function will analyze and capture your selection’s frequencies as a noise profile.
4. Select the Entire Track
Next, you’ll want to select the whole recording. You can either click Select > All in the drop-down menu or use the Crtl + A shortcut.
5. Click OK
After you select the entire track, you’ll need to navigate to the Effect > Noise Reduction menu again.
This time, instead of hitting the noise profile button, click OK. The software will use your saved noise profile to remove those frequencies from your audio.
And that’s it! In just 5 simple steps, you’ve successfully used the effect to clean up your audio.
How to Optimize the Effect — Noise Reduction Tips
When you reach step 5, you’ll notice that the default settings for Noise Reduction, Sensitivity, and Frequency Smoothing (bands) are above the OK button.
In most cases, these default settings are more than enough to clean up a clip, especially if you’re a beginner.
However, if you want more control over your audio, you can adjust the settings as you please. Use the slider to increase or decrease the intensity of the settings.
Adjust the Settings Sparingly
If you’re unfamiliar with audio editing, your first instinct might be to crank the sliders up all the way. Isn’t that the best way to remove all the low humming and buzzing?
If you adopt this all-or-nothing approach, your audio will likely sound worse than it did before.
Don’t believe us? Try it for yourself — turn up the Noise Reduction, Sensitivity, and Frequency Smoothing as high as they’ll go.
All of the humming and buzzing will be gone, but so will other parts of your audio. As a result, your voice will be muffled and almost sound like you’re talking underwater.
So, when you adjust the sliders, do so sparingly. Pay careful attention to the Sensitivity setting, as it tells the program how liberal it should be when deciding what audio to remove.
Use the “Undo” and “Redo” Buttons to Preview
You should compare the original audio against the edited audio to preview the effect and ensure it’s working as you want it to.
To do this:
- Add the Noise Reduction effect and listen to the recorded audio.
- Then, click Edit > Undo Noise Reduction to listen to the original version.
- Go back to the edited version by clicking the “Redo Noise Reduction” button.
Continue toggling back and forth to hear the difference. Fine-tune the sliders accordingly if the edited audio isn’t quite how you want it.
Know the Difference Between Reduce and Residue
You’ll also notice two radio buttons on the popup menu that indicate what kind of sound you’re listening to. The two options are either Reduce or Residue.
- Reduce is the default setting. When you toggle this button, you’ll hear what the audio sounds like with noise removal.
- Residue, on the other hand, lets you hear the noise removed. It gives you an idea of how much noise the tool is removing from your original audio.
If you hear too much of your voice or music in Residue mode, consider turning down the Sensitivity or Frequency Smoothing settings.
Realize That Your Workflow Is Progressive
You must realize that your workflow is progressive when using Audacity’s noise reduction.
Not sure what we mean? Let’s use an example to illustrate this concept.
Your recorded audio has a lot of background noise, so you move the sliders relatively high. When you listen back, you realize you were a little too liberal. So, you go back into the Noise Reduction feature and move the sliders back down.
But, when you play it back, the audio still sounds overly edited. Why is this the case?
It’s because the second time you used Noise Reduction, it applied to the edited audio rather than the original (i.e., a progressive workflow).
In this scenario, you would want to undo your previous action before going back into the Noise Reduction effect.
Audacity Tools That Complement Noise Reduction
If you all want to use noise removal, then so be it. Noise removal should be more than enough to make your recordings sound amazing. Simply apply it and save the finished product to your computer.
No matter what you do, noise removal will inevitably distort your audio. These distortions are a natural part of the process, but you can help overcome them through Audacity’s range of other tools.
For example, you can adjust the volume if you want to make your voice/music/sound effects louder or quieter. You can also normalize audio levels to ensure your audience has a consistent listening experience.
FAQs
How Do I Remove Background Noise From an Audio File?
You will need a website or program like Audacity to remove background noise from recordings. The software can capture your voice and help you remove the noise you don’t want.
Does Audacity Have Noise Reduction?
Yes. Noise Reduction is one of Audacity’s many useful effects.
How Can I Reduce Noise From Sound?
Noise is an inevitable part of any recording. But, you can take steps to reduce the amount of noise in your recordings as much as possible. It’ll be worth the extra effort as it makes editing easier.
The easiest thing you can do is find a quiet room and turn off the fan, AC, loud computers, etc. You can also buy affordable recording equipment to filter unwanted humming or buzzing. Several websites sell affordable microphones, soundproofing panels, etc.
Final Thoughts
Looking for the ideal way to create professional-sounding podcasts? Look no further than Audacity. This program can drastically improve audio quality by removing unwanted background humming or buzzing.
We thoroughly explained how to use the program to reduce noise. To summarize, the process involves selecting a portion of your clip that represents the noise you want to remove. Then, you apply the effect to the rest of your audio.
Be sure to bookmark this guide for the next time you need a perfect-sounding recording. And if you don’t already have Audacity, be sure to get the free program. All you have to do is visit Audacity’s website, browse the links, and click the option that corresponds to your operating system.


