
AirPods, renowned for their sleek design and superior sound quality, have become a staple accessory for many. Yet, an AirPods microphone muffled issue is a common issue plaguing users, hindering clear communication during calls and recordings.
This article delves into the root causes of this problem, ranging from dirt and moisture in the microphone’s openings to firmware glitches, and offers practical solutions.
By understanding and addressing these issues through effective cleaning, troubleshooting, and regular maintenance, you can enhance your AirPods experience and ensure crystal-clear audio in all your interactions.
Why do my AirPods sound muffled?
AirPods may sound muffled due to earwax buildup, Bluetooth interference, or needing a reset. Here is a full troubleshooting guide to ensure you get clear sound back.
Key Takeaways
- Muffled AirPods microphone may be caused by dirt, debris, or settings issues.
- Proper troubleshooting, cleaning, and maintenance reduce the risk of recurrence.
- Regular firmware updates can enhance microphone performance and stability.
- Checking and resetting Bluetooth connections can resolve connectivity-related audio problems.
- Seek professional help from Apple Support if all other methods fail, or if the issue persists.
🛠️ Quick Fixes: Airpod Microphone Muffled 🛠️
Are you experiencing muffled microphone issues with your AirPod Pro headphones? Here’s a guide to identify and solve common problems.
| 🚨 Issue | 🛠️ Solution |
|---|---|
| 🧽 Dirt, Debris or Moisture in Microphone Openings | 🧹 Clean AirPods gently with a soft, dry cloth or cotton swab. Avoid using sharp objects. |
| ⚙️ Settings or Firmware Interference | 🔧 Check Bluetooth settings, update firmware, and adjust Siri settings as necessary. |
| 🔋 Charging and Battery Issues | ⚡ Ensure AirPods are properly charged. Clean charging contacts if necessary. |
| 🔊 Low Battery Affecting Sound Quality | 📱 Fully charge AirPods before use and consider using one AirPod at a time to conserve battery. |
| 🔄 Need to Reset AirPods | ⏱️ Reset AirPods by pressing and holding the setup button on the charging case for 15 seconds. |
| 📶 Bluetooth Connection Issues | 🌐 Toggle Bluetooth off and on, and ensure a stable connection with the device. |
| 🛠️ Damaged or Faulty Hardware | 📞 Contact Apple Support for a professional assessment and potential repair or replacement. |
🛠️ See also: AirPod Mic Not Working: Quick Fixes and Solutions
Understanding the Issue
As an AirPods user, I have experienced situations where my AirPods’ microphone sounds muffled. This issue might compromise audio quality during phone calls, leaving both me and the listener frustrated.
Although the main problem is not in noisy environments, the muffled sound occurs frequently in those situations. In this section, I will discuss the potential reasons for muffled audio and gather plausible solutions.

Firstly, the battery level might be a reason for the muffled microphone. A low battery can negatively affect overall sound quality. From experience, I’ve noticed that fully charging my AirPods before using them for calls significantly improves their performance.
In case both the AirPods and the microphone still function poorly, it might be necessary to try using only one AirPod to conserve battery life.
Another possible cause could be dirt or debris obstruction in the microphone grille. AirPods, being small in size, might catch dust or debris around the microphone, causing the sound to become muffled.

To fix this, I’ve made it a habit of gently cleaning the grille using a soft brush or cotton swab, taking care not to damage it.
A more technical possibility might be the need to reset my AirPods. Resetting the AirPods can help eliminate potential glitches and restore the original audio quality.
To do this, I’ve followed the instructions to press and hold down the setup button on the back of their charging case for at least 15 seconds.
As an avid user of AirPods during calls, understanding the issue of the muffled microphone is necessary.
By keeping the AirPods charged, clean, and reset occasionally, I am better capable of maintaining good audio quality in my phone calls, even in noisy conditions.
Investigating Common Causes
One of the main reasons for the AirPods Pro microphone’s muffled noise is the accumulation of dirt, dust, and debris on the speaker grilles. In some cases, earwax from your ear canal can also get lodged onto the speaker grille, compromising the microphone’s audio quality.
To address this issue, I carefully clean my AirPods using a soft, dry cotton swab to remove any visible gunk or build-up.
Guide: How to Test AirPod Microphone
Apart from debris, the presence of liquid on the speaker grilles can cause muffled sound. To avoid moisture-related issues, I keep my ears dry before wearing the AirPods and avoid using them in wet environments. I gently dab it off with a soft cloth if there is any noticeable moisture.
When using AirPods, it’s also essential to ensure a proper fit with the ear tips. Ill-fitting ear tips can cause the microphone to sound muffled as well. I regularly check and adjust my AirPods’ ear tips to ensure optimal sound quality.
Furthermore, I ensure that the sensors and accelerometers on my AirPods function correctly, as they play a crucial role in maintaining audio quality. If I suspect any issues with these components, I consult the instructions provided by Apple to troubleshoot and resolve the problem.
Solved: One Airpod Not Working: Quick Fix Solutions.
Lastly, a useful technique to clean speaker grilles is using compressed air. I use this method cautiously by holding the canister at an appropriate distance from my AirPods to avoid any damage. By taking these preventive and maintenance measures, I can effectively minimize and address the causes of a muffled AirPods microphone.
Role of Settings and Firmware
In my experience with AirPods Pro and other Apple devices like iPhone and iPad, there are several settings and firmware factors that could impact the microphone performance.

Having a muffled microphone can negatively affect phone call quality and overall user experience. Let me share a few insights on how to address these issues.
Firstly, it’s important to ensure that the Bluetooth connection between the AirPods Pro and the iPhone or iPad is stable. A weak Bluetooth connection might cause interference in audio transmission, resulting in a muffled sound.
To fix this, I usually turn off and then turn on the Bluetooth, reconnect the AirPods Pro, or simply restart my device.
Siri can also play a role in controlling the AirPods Pro’s settings. I noticed that sometimes Siri’s settings can inadvertently change the microphone volume or switch between noise cancellation and transparency mode. It’s a good idea to check Siri settings to make sure they match my preferences.
Another key factor I pay attention to is my AirPods Pro firmware. Apple releases regular firmware updates to improve device performance and fix bugs. I make sure to update my firmware for the best possible experience.
Solved: Which AirPod has the Mic?
To check and update the firmware, I connect my AirPods Pro to my iPhone or iPad and head to the Settings app. Under General > About > AirPods Pro > Firmware Version, I can check the current firmware and apply any updates available.
Accessibility settings are also important to consider. On my iPhone or iPad, I navigate to Settings > Accessibility > Audio/Visual, and then adjust the settings to find the optimal balance that works for me. This can include adjusting the audio balance, enabling or disabling noise cancellation, and adjusting transparency mode.
In conclusion, addressing settings and firmware issues is crucial for a better AirPods microphone experience.
By checking the Bluetooth connection, paying attention to Siri settings, updating the firmware, and optimizing accessibility settings, I have successfully improved my AirPods Pro microphone performance.
Troubleshooting Methods
To effectively resolve the muffled microphone issue in AirPods, ensure they are fully charged and meticulously clean the speaker grilles. Additionally, refreshing the Bluetooth connection and updating the device software can significantly enhance microphone performance.
When I encounter a muffled AirPods microphone, I follow a few troubleshooting methods to fix the issue. First, I start by checking the battery of my AirPods. Low battery power can cause the microphone to sound muffled, so it’s important to ensure they have enough charge.
A proper cleaning of the AirPods also helps eliminate any debris or buildup on the speaker grilles. I gently use a cotton swab or toothpick to clean the grilles and maintain the microphone’s performance.
In case the problem persists, I toggle my Bluetooth off and on. This simple action can help re-establish a solid connection between my AirPods and my device. Additionally, I try disconnecting other Bluetooth devices that might interfere with the connection.
To further improve the connection, I make sure that my macOS or other software is up-to-date.
To pinpoint the issue, I consider switching the microphone input. I select one AirPod to function as the main microphone in my audio settings. You can also reset or reconnect your AirPods if the microphone still sounds muffled.
- NEXT-LEVEL ACTIVE NOISE CANCELLATION
- CUSTOMIZABLE IN EAR FIT
- LONGER BATTERY LIFE
To reset my AirPods, I press and hold the setup button on the charging case until the status light flashes amber, then white. After resetting, I can then re-pair my AirPods with my device.
It is worthwhile to reset my AirPods by selecting “Forget This Device” in my Bluetooth settings, and then reconnect them. Restarting the paired device may also help as a last resort.
By performing these troubleshooting methods, I can successfully fix the muffled microphone issue for my AirPods and improve the overall audio quality during calls and recordings.
Maintenance and Cleaning Guide
To maintain the best possible performance for your AirPods and address the muffled microphone issue, it’s crucial to keep them clean.
I recommend using a soft cloth or cotton swab with either rubbing alcohol or water to remove any dirt buildup on the microphone and speaker meshes.
However, keep in mind not to get any liquid inside the microphone or other openings, as that may cause further damage. Always make sure the AirPods are completely dry before using them again.
| ❓ Issue | Solution |
|---|---|
| 🚫 Dirt, Debris or Moisture in Microphone Openings | ⚠️ Clean with a soft, dry cloth or cotton swab. Use rubbing alcohol or water carefully. |
| 🧹 Regular Cleaning Needed | 🧼 Regularly wipe outer surfaces with a lint-free cloth and clean microphone and speaker meshes. |
| 🔋 Low Battery Affecting Sound Quality | ⚡ Charge AirPods fully and check the battery level to ensure optimum performance. |
| 🔄 Reset Required | ⚙️ Press and hold the setup button on the charging case for at least 15 seconds to reset. |
If your AirPods are still sounding muffled after cleaning, it’s possible that there’s debris or dust blocking the air passage. In this case, I suggest using a can of compressed air to blow out any dust particles lodged in the mesh gently.
Remember to hold the can at an appropriate distance to avoid damaging the delicate components with a forceful blast of air.
Cleaning your AirPods regularly is a good idea to prevent future issues. This can be done by gently wiping the outer surfaces with a lint-free cloth and attending to the microphone and speaker meshes as needed.
Guide: AirPod Static Noise in One Ear: Solved
If the battery is low, it may also cause the AirPods microphone to sound muffled. To resolve this, ensure both AirPods are fully charged and reset them by pressing and holding down the setup button located on the back of their charging case for at least 15 seconds.
By following these simple maintenance and cleaning tips, I hope you’ll be able to enjoy crystal-clear audio quality on your AirPods and prevent any muffled microphone issues in the future.
Charging and Battery Issues
As an AirPods user, I’ve come across some charging and battery issues that may lead to a muffled microphone. One key factor in ensuring optimal AirPods microphone performance is making sure they are properly charged.
Guide: What to do if the AirPod Case is not charging.
When charging my AirPods, I put them in the charging case and close the lid. If I don’t see an amber status light indicating that they’re charging, I might need to clean the charge contacts on both the AirPods and the contact points in the case.
To do this, I use a soft, dry cloth. After cleaning, I insert the AirPods back into the case and check for the amber light. If the issue still occurs, I might need to reset my AirPods.
Battery level plays a crucial role in AirPods’ microphone quality. To check my AirPods’ battery level, I open the case lid with the AirPods inside and hold it close to my iPhone, iPad, or iPod touch.
After a few seconds, I see the battery status of my AirPods. Alternatively, I can check their battery level using the Batteries widget on my iOS device.

It is worth mentioning that if I experience microphone muffling, I should also ensure my devices have the latest iOS updates installed, as these updates may contain battery life and performance improvements relevant to my AirPods.
Keeping my AirPods charged and maintaining their battery levels has significantly helped reduce the chances of experiencing a muffled microphone.
Staying on top of updates and regularly cleaning the charging contacts ensures that my AirPods are always ready for use with the best possible audio quality.
Pros and Cons
Pros
- Regular maintenance can extend the lifespan of your AirPods.
- Troubleshooting steps are straightforward and can be done at home.
- Firmware updates and proper settings ensure optimal functionality.
Cons
- Resolving microphone issues may require time and patience.
- Professional repairs might be necessary if troubleshooting fails, potentially incurring costs.
When to Contact Apple Support
If you’re experiencing issues with your AirPods microphone sounding muffled or distorted, it’s important to know when to reach out to Apple Support for assistance. As a user, I have had my fair share of problems with Apple products, and I’m familiar with the steps to take.

Firstly, I recommend trying a few troubleshooting steps at home to see if the issue can be resolved without contacting Apple Support. This can include cleaning the microphones on the AirPods, ensuring a secure Bluetooth connection, and resetting the AirPods by holding the button on the case.
However, if the problem persists after trying these steps, it’s time to contact Apple Support. Their technicians are knowledgeable and can provide you with a solution.
Issues that warrant contacting Apple Support include consistent audio distortion, a damaged AirPods case or earpiece, or general questions about warranty coverage.
If your AirPods’ microphone issue falls under Apple’s warranty policy, they may offer a repair or replacement. For example, Apple can replace your AirPods battery at a service fee if it’s worn down from normal use.
Additionally, AppleCare+ for Headphones covers battery replacements if your product’s battery holds less than 80% of its original capacity.
Remember that Apple Support is there to help you and ensure the best experience with your AirPods. As a user myself, I can vouch for their professionalism and expertise. So don’t hesitate to contact them whenever you face persistent problems with your AirPods microphone.
Frequently Asked Questions
How can I fix a muffled microphone on my AirPods?
I always start by toggling Bluetooth off and on, as this can help resolve connectivity issues. Disconnecting other Bluetooth devices and ensuring a stable Bluetooth connection may also help. Additionally, consider switching the microphone input or updating the macOS on your connected device for better performance.
What causes the AirPods Pro microphone to sound muffled?
The AirPods Pro microphone can often sound muffled due to dirty speaker grilles. This is because the wireless earbuds rest inside the ear canal, where they accumulate dirt and debris over time.
How do I clean the microphone on my AirPods?
I use a soft, dry, lint-free cloth to clean my AirPods, focusing on the speaker grille and microphone areas. I avoid using sharp objects that could damage the delicate components. For hard-to-reach areas, I use a brush with soft bristles, taking care not to puncture any openings.
Why does my AirPods Max microphone produce muffled sound?
My AirPods Max microphone might produce a muffled sound for various reasons, including dirty exterior components, low battery, or poor Bluetooth connection. Performing a firmware update on the connected device or establishing a stable connection might help address this issue.
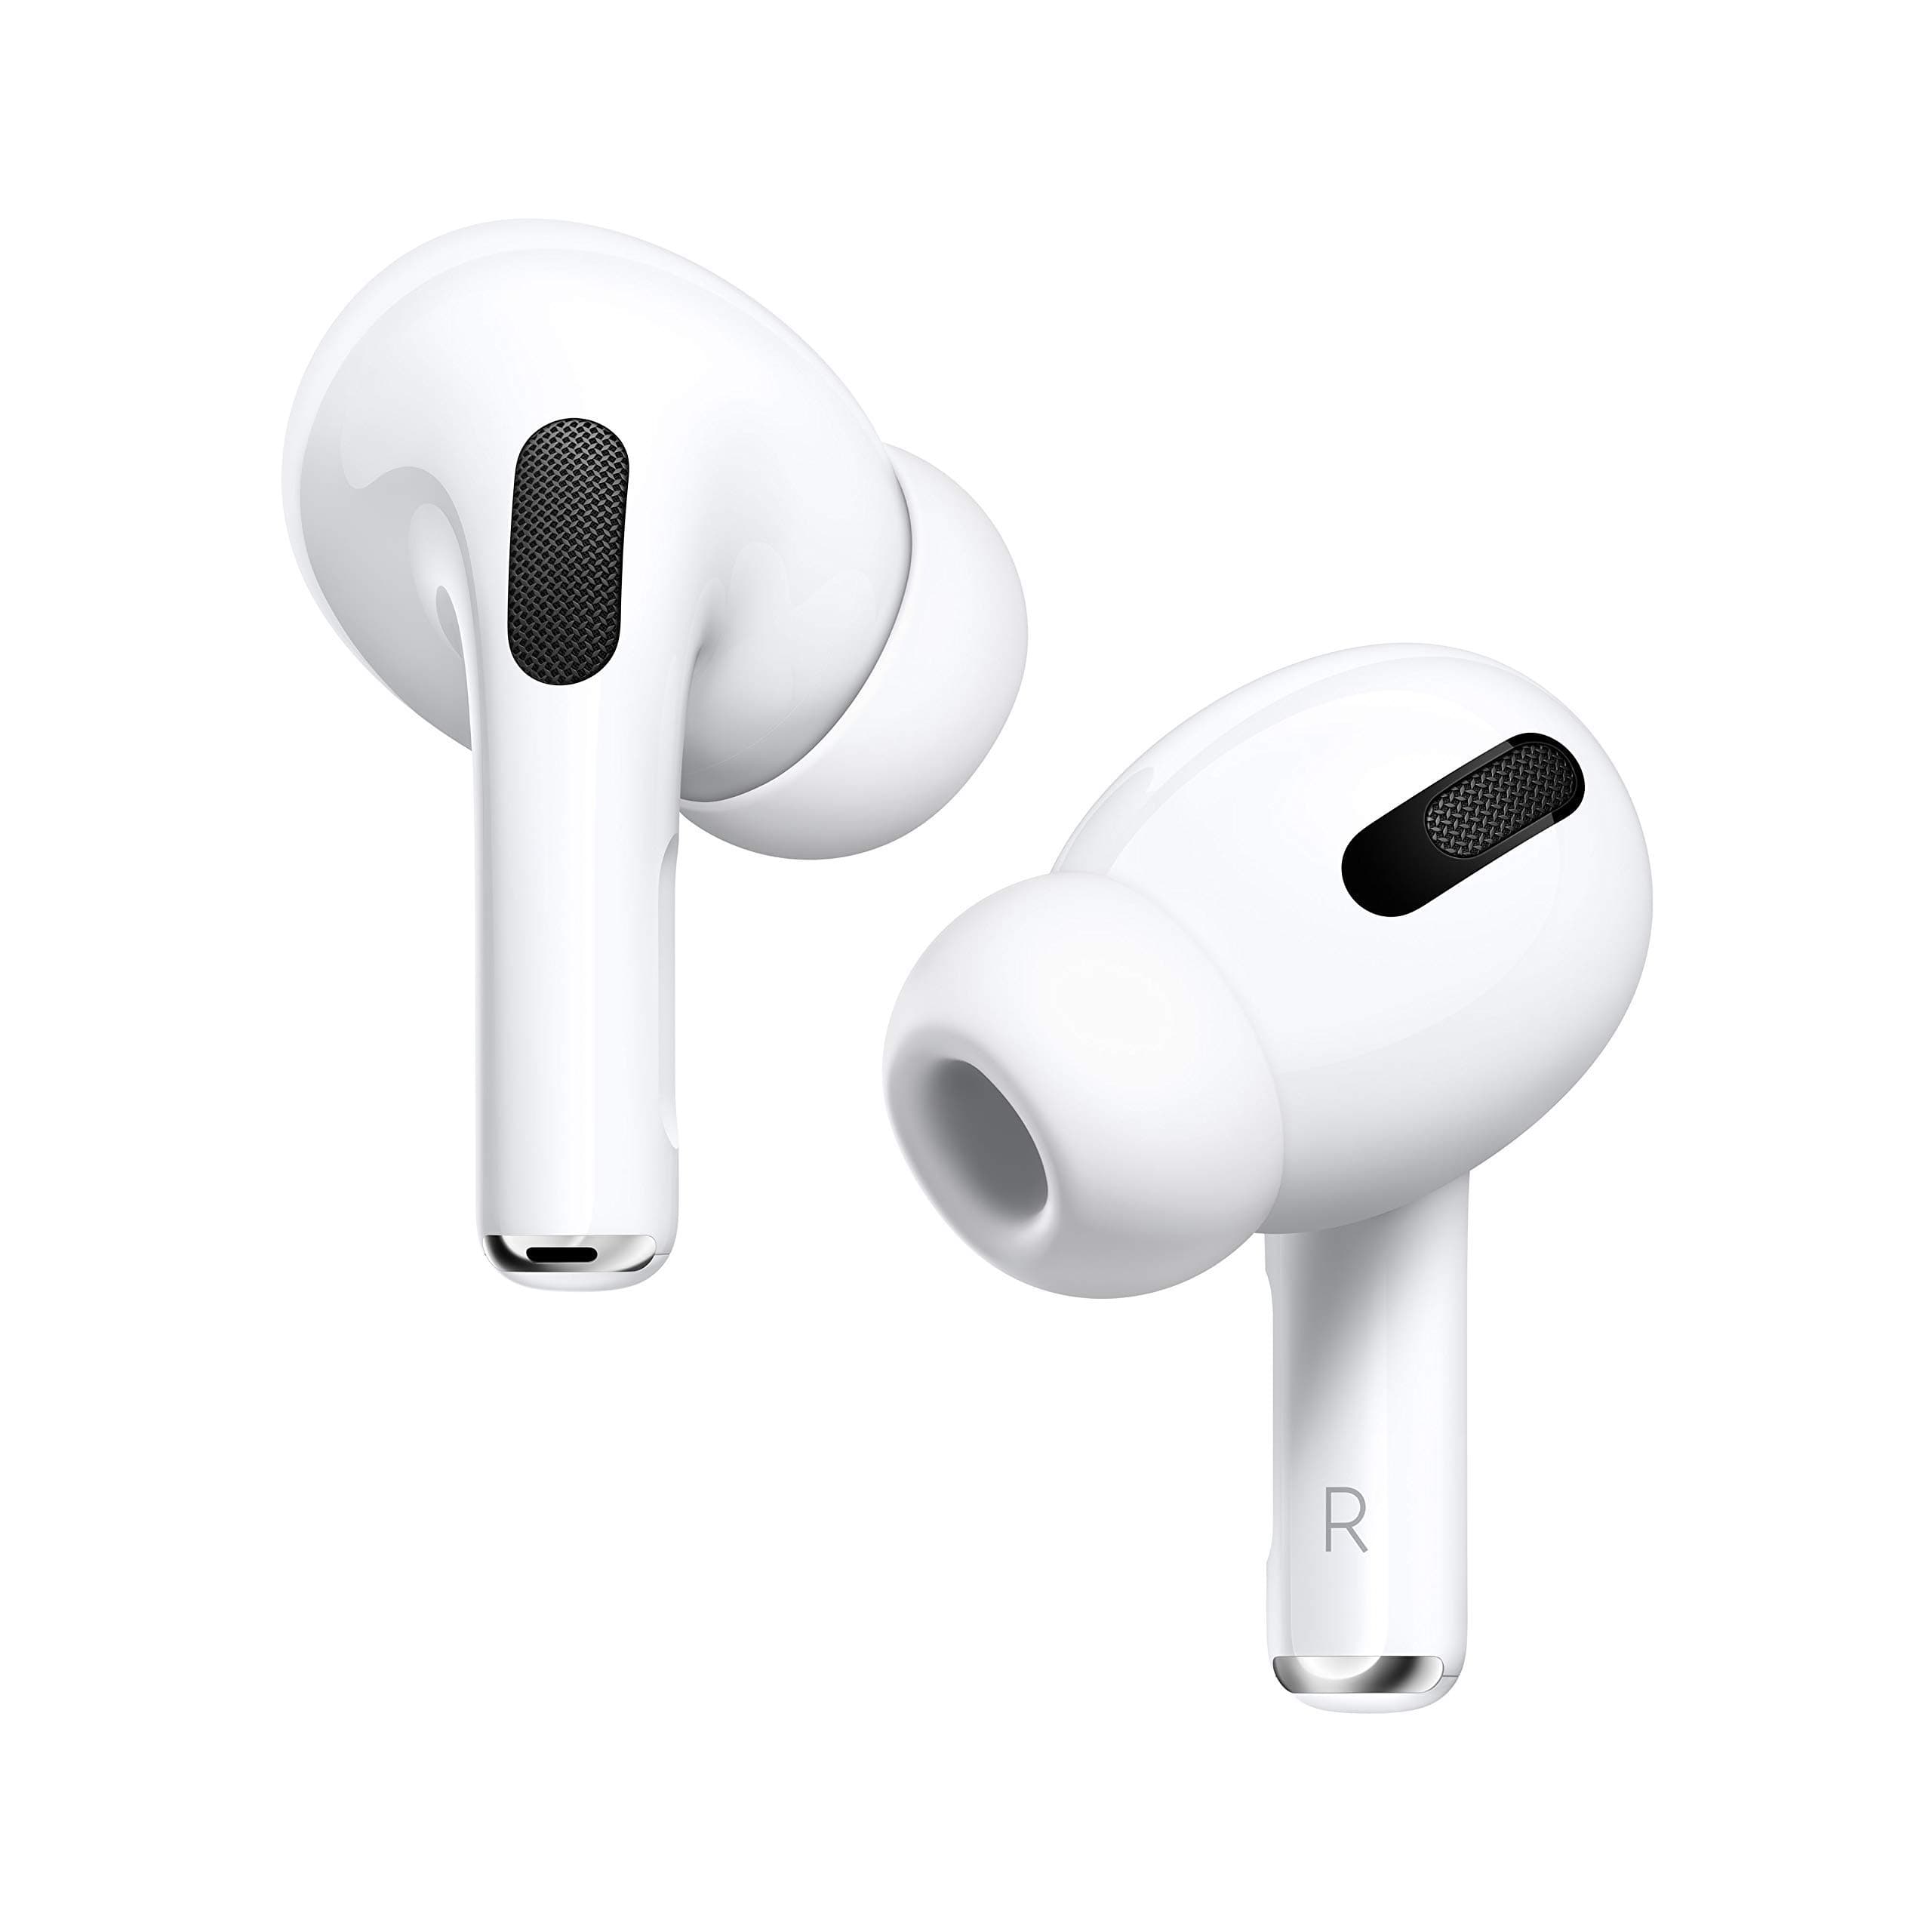
Where is the microphone located on the AirPods Pro?
The microphone on my AirPods Pro is on each bud’s bottom portion. It includes a small mesh-covered opening, which effectively captures voice audio during phone calls or voice recordings.
How can I improve the microphone volume on my AirPods?
I can improve the microphone volume on my AirPods by adjusting the input volume on the connected device. It’s essential to go into the device’s system preferences or settings, then locate the Bluetooth or audio settings, and adjust the input volume level accordingly.
Conclusion
I found several reasons why an AirPods microphone might sound muffled. One common cause is a buildup of dust, lint, or debris in the microphone holes, which can impact the sound quality.
Regular cleaning and resetting your AirPods can resolve these issues. If the problem persists, there might be a hardware issue with the microphone itself. In this case, it’s advisable to contact Apple support or visit an authorized service center for further assistance.
In conclusion, by regularly cleaning your AirPods, ensuring proper connections to your device, and seeking professional help, you can improve your AirPods’ microphone quality and enjoy clear, uninterrupted audio during calls and recordings.


